Showing posts with label Holiday Crafts. Show all posts

Wednesday, October 11, 2017

DIY Pumpkin Applique, Holiday Projects are Starting!


Happy Fall and welcome to Crafting Season! Today is the day my annual holiday project emails start. A long, long time ago, I started the Holiday Projects emails. When I started these I was making ceramic beads and created 10 holiday projects using the beads I made. They were all Christmas related. As the years continued, I continued with the name Holiday Projects because that's how everyone knows them. And after the last few days on Facebook and Instagram, I have heard how much you love them. I love to hear that you look forward to them and if you want to let your crafty friends know about them, please do. The sign up is at the bottom of this post. This year I have done some tweaking to make them work better for all of us. And, I am not limiting the projects to 10, there will be loads of inspiration coming your way. So let's get going!


It's starting to get darker earlier, there a little chill in the air and everything is just a bit cozier. Wouldn't you agree? With all of this coziness, I love to sit and sew at my machine, embroider by the fire, and bead at the kitchen table with the busy-ness of the house going on around me. Over the next ten weeks I will be bringing you weekly projects delivered by email, daily inspiration through social media, and I will be opening a handmade pop up shop. I think you will like this improved version of the holiday projects better.

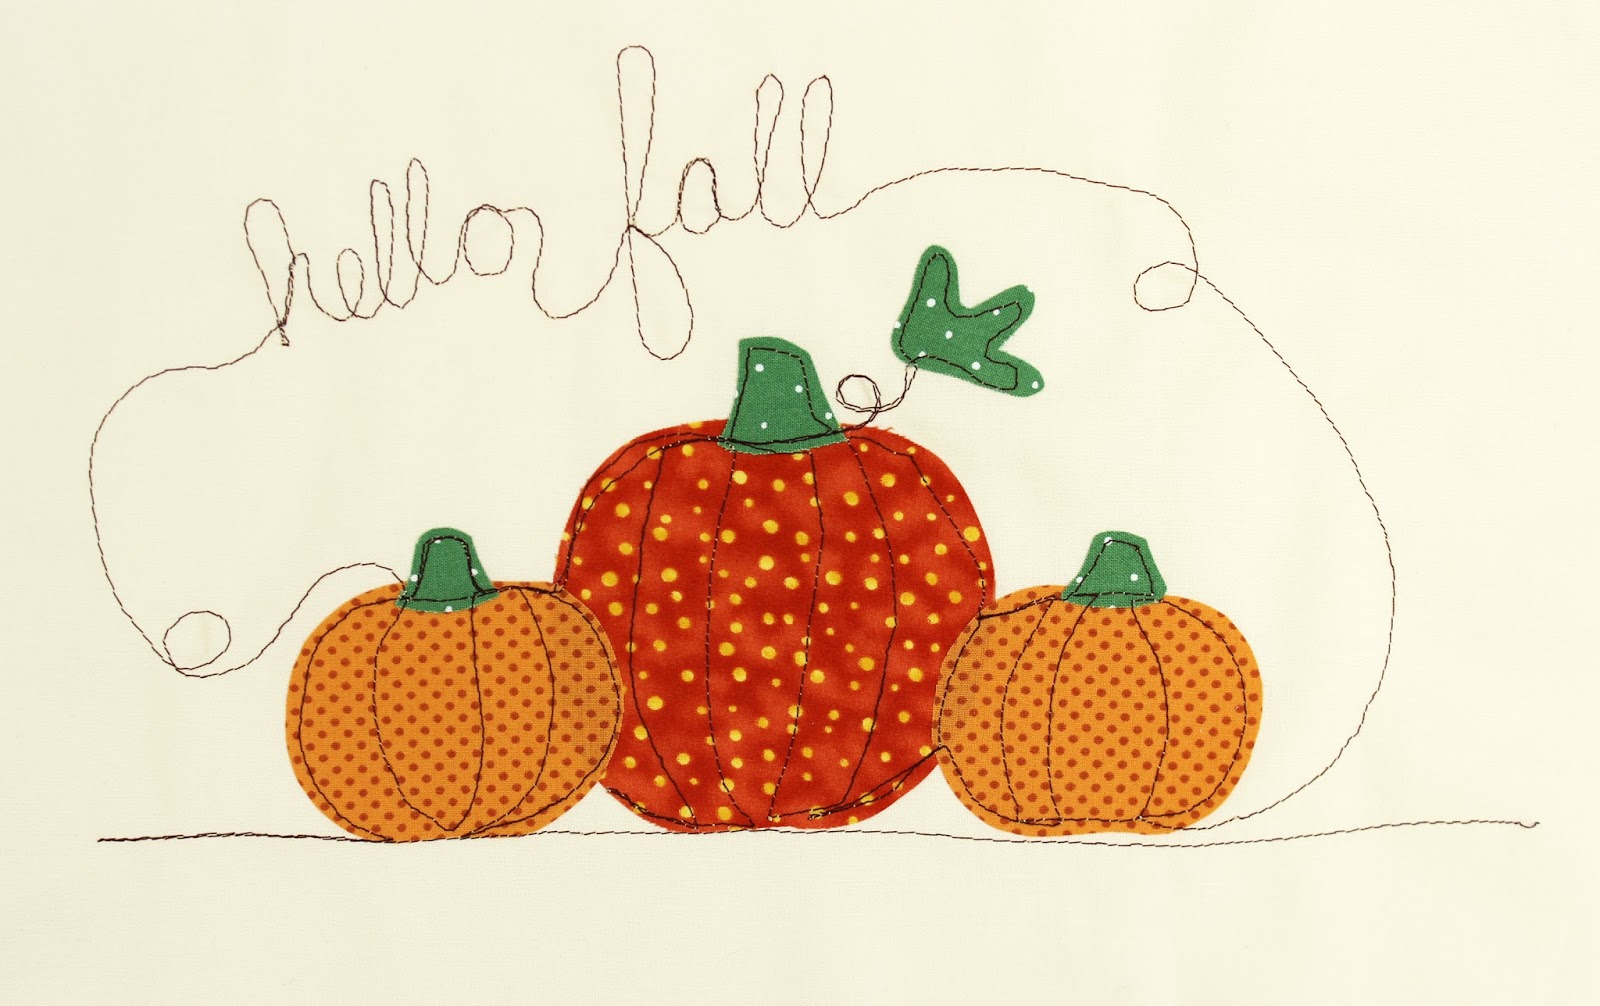
This week to kick off the holiday projects and fall, I am bringing you a pumpkin applique set. You can download it here. They are reversed and ready for tracing onto paper backed fusible webbing. I decided to do some free motion embroidery on mine.


To do this, I drew where I wanted to stitch with a Frixion pen. If you haven't used these, they are great. You just iron the ink and it disappears. (As always be sure to test it on a scrap first, darker colors leave a little residue sometimes.)

This pumpkin applique could be used on a mug rug, an apron, a tea towel, a t-shirt, oh so many things. Please post a picture and tag me @jenniferjangles on Facebook or Instagram. If you got the newsletter today, you might have noticed the readers projects, I would love to see your pumpkin applique there next week.


Here's a an image to pin to one of your Pinterest boards for safe keeping.


Happy Sewing,


The pop up shop starts next week, October 18th.


--------------------------------------------------------------------------------------------------------------------------

Wednesday, November 19, 2014

Lollipop Decorations


These lollipops were featured in Quilts and More a few years ago, just in case you're thinking they look familiar. The pattern was available through the magazine only but now I can share it with you. These are fun to make are are a great scrap buster.

If your new to sewing or piecing, this is a perfect project to try. If your center points don't line up, it's okay, they're covered with a button. There are only two pattern pieces for this project, so I do hope you sew some up.


The printable pattern pieces are here.

Supplies:
2 squares of cotton quilting fabric 10" x 10" each
1 yard ribbon
1" button
1 paper straw
Instructions:
1. Using the printed pattern pieces, cut 1 back and 4 triangles from one fabric and 4 triangles from your second fabric.
2. Start by sewing 4 sets of triangles together using two different fabrics. Make sure each set is sewn on the same side. This will insure that your pieces alternate fabrics.


3. Press the seams open. Sew two of the sets together to make a half circle. Sew the remaining two sets to make a second half circle.

4. Press open the seams. Now sew the two half circles together to make the complete front circle.  


5. Align the front and back of the lollipop together with right sides facing inward. Take a 8" piece of ribbon, fold it in half and insert the loop side in between the two fabric layers. Leaving approximately 1/2" sticking out, pin into place. Sew around the outer edge using a 1/4" seam allowance. Leave a 2" gap for turning.

6. Clip the edges and turn right sides out. Fill with fiberfill.

7. Slide the paper straw approximately 2" into the opening of the lollipop. Hand stitch the opening closed. While you're stitching, sew through the paper straws one or two times to secure.
8. Using the remaining ribbon, tie a bow at the base of the lollipop around the straw. Tack stitch in place.


9. Sew a button to the center of the lollipop. While sewing it on, send your needle all of the way through to the back of the lollipop and pull the thread snug. Do this several times to secure it.

Hope you had fun!


I've added some kits to the Jennifer Jangles Shop as well as my Etsy shop so you can have everything you need to make a lollipop decoration. 


Visit my Website, Etsy Shop, Blog, Facebook

Thursday, November 17, 2011

Ornament How-To

Hello, Hello,

I wanted to show you an easy ornament that I love to make using my holiday pendants. I used 18 gauge silver craft wire and made a spiral at one end. I sent the wire through the pendant hole so the spiral is on top, bent the wire upwards, and slid a bead on. I could then use my round nose pliers to make a larger spiral at the other end for the hanger.

Can't be a five minute project, eh? I just added a hole bunch of holiday pendants to the Etsy shop this morning. You can find them in the Jennifer Jangles web store as well.

Happy Holidays,
Jennifer
Visit my Website, Etsy Shop, Blog, Facebook, or Studio and Gallery

Friday, September 30, 2011

What's going On

  Hello, Hello,

Man, I have been meaning to blog all week but the batteries were dead in my camera. I could never do a post without a picture. It took me until today to remember to charge them. But now they are good to go. I quickly snapped a few shots around the studio for this post. I'm going to take more pictures later today and then I will be good to go for blogging again.


So what's up? Happy Friday...wahoo. I have been working every Saturday at the gallery for the past month but this Saturday Katie will be working. I am really happy to have the day off.  Even though, I will still be dropping my boys off because they have clay class there. Here's a picture of some of their pots.....

 Aren't they the cutest things ever? Lisa, the kids clay teacher, has the greatest projects planned out for them. They also made the cutest turkeys, they aren't glazed yet so I'll show you them later.

And the stars in the above pictures...they were for a customer. I always have some painted and ready to go in the gallery. But Tiffany wanted a whole row of stars for her kitchen above her windows and doors. We lined them up to see how it would look. I am ordering more stars to paint today, it looks so dang cute, I am going to need some in my house as well. Love them!

Holiday projects start next week! Yikes, Katie and I are scurrying around to get things ready. I have so many things to add to the website and Etsy shop. I am working on finishing up some projects as well. I am doing my best to be organized, you know carry my summer of organization in fall. I just know that probably in about a month it will all fall apart when the holiday rush becomes reality. I'm doing my best to stay calm until then.

I noticed over at Etsy they are having their holiday boot camp. If you're a seller of any kind needing to get ready for the holidays they have some great suggestions. Because I am crazy, I do most of the planning in July and August when things are slow.

Happy Friday and see you soon!
Jennifer

Visit my Website, Etsy Shop, Blog, Facebook, or Studio and Gallery

Friday, September 9, 2011

Holiday Projects, A Must Read

They are coming! Yippee... I wanted to have one of those countdown clocks telling you exactly how many weeks, days, minutes,etc. that were left until the first project would go out. But it turns out, I am having some java script issues. It's not serious...I'm going to be alright. :)

I am going to do it the old fashion way. October 6th is the day! That means there are only 27 days until they start! Wahoo again!

If you aren't familiar with my annual Holiday Project newsletters then I will give you an idea of what you're in for. If you have always received my holiday newsletters, I advise you keep reading because there are new things being added this year. First of all, this is my fourth year of projects. I think I might do bullet points for the rest of my explanation.... Here we go.....

                  * A new project every week for ten weeks, to get you prepared for the holidays
                  * New work every week
                  * A sale or special every week just for newsletter subscribers
                  * Freebies
                  * A give a way every week
                  * Lots of fun!

You say you need to be on the mailing list? Sign up here at the bottom of the page. To entice you a little more, any new subscriber between now and October 5th will receive a coupon for 25% off your first order. Once you sign up I will e-mail you the code.If you already are a subscriber and your bummed about not getting the coupon....how about a giveaway to cheer you up?

Leave me a comment here at this post and you will be entered to win a big ol' stash of New Holiday beads. They are beads that will be debuting in the first newsletter so unfortunately I cannot show you the prize. But above are some snowmen and trees to fill in their place.

I will randomly choose a winner for the give a way on October 6th.

When you leave me a comment, I want to hear....are you making your holiday gifts? Will you be sewing or beading them? I love, love, love to read what you're up to so thanks in advance for the comments....

Have a great day,
Jennifer


Visit my Website, Etsy Shop, Blog, Facebook, or Studio and Gallery

Friday, December 7, 2007

Holiday Jars


Hey there everyone, I just couldn't stop with ornament Thursday. I made these jars last night. I thought they would be great for putting baked goodies in for gifts. They were really easy to do. I spray painted the lids of canning jars. Once they were dry I hammered a nail through the center of the lid and then pulled the nail out. This left a hole just the size for my 18 gauge craft wire. I made a little spiral at one end, threaded it through the hole and put a dab of hot glue on the wire to hold it in place. While I had the hot glue gun on, I went ahead and put a little around the rim on the inside. This will hold the two lid pieces together. Next I added some glitter, strung on the beads and finished off the top with a little spiral or star.

Happy Beading!
Jennifer
Pin It button on image hover