Showing posts with label holiday projects. Show all posts

Wednesday, December 17, 2014

Sewn Gift Tags


For the past few years I have made printable gift tags for you to print out for tagging your gifts. I had some fun with them and made them into stitched gift tags. They are great for using up lots of little trim scraps as well as buttons and fabric.

Here's what you'll need.

Gift Tags Printable
Printable fabric
Fabric and Trim Scraps
8" Ribbon for hanging
Fusible Webbing
Fusible Fleece


First of all, this is kind of a free for all project, anything goes so there aren't real specific instructions. But here's basically how to make the tags.

Print the tag document out onto the printable fabric sheet.


The tags measure approximately 3" x 3.5" so I cut the fabric for the backing to be 4" x 4.5". You'll need to pieces per tag as well as a piece of fusible fleece the same size.


Iron the fleece to the back of one of the squares.


 Using the paper backed fusible webbing adhere the sheet of printed tags. Trim the tags to size. Iron  on to the front of one of the squares.


Place the front of the tag onto the fleece. Cut a piece of ribbon for the hanging part of the tag, fold it in half and slide it in-between two layers of the tag. Pin this in place.

Using your machine sew around the edges of the tag and the printed tag to secure. Here's a great chance to use some of this decorative stitches on your machine.


Sew any trims or ribbons on as well. Hand stitch any buttons or embellishments on and you are finished!


Happy Holidays!


Visit my Website, Etsy Shop, Blog, Facebook

Wednesday, October 22, 2014

Snowflake Applique Pillows, Holiday Project #2


Holiday Project two is coming at you today. It's a pair of appliquéd Snowflake Pillows. I'm thinking there needs to be a matching quilt in my house with these as well. You can find the printable appliqué pattern here. These two pillows are 16 and 18 inches. The appliqués are for these two sizes, but you could always play around with your print settings and make the appliqués larger or smaller to meet your needs.

In this tutorial, I'm going to give you the how to on the appliqué. There are loads of pillow making tutorials on the internet, as well as quilts, and bags, and anything else you could imagine putting a snowflake on so I will let you use your imagination on this one.


To create the large snowflake trace six of the dendrites(arms) , 6 end circles and the center onto the fusible webbing of your choice, I used Heat n Bond Lite. Cut out the paper backed webbing loosely and iron them on to the corresponding fabrics. Cut out the snowflake parts on the traced line, peel off the paper backing. Arrange the six dendrites so that the ends all meet up in the middle. Place the center circle over the top. At this point you can tweak where you would like the dendrites to be. Once you've got everything in place, iron the appliqués to the fabric. If you're making the large snowflake iron the circles on the top of the smaller circle on the outer edge of the dendrite.


To stitch the appliqué in place I did free motion embroidery around the outsides because that's my favorite stitch right now, but you could do a zig zag or button hole/applique stitch.

Stitch a button in the center and on each of the ends of the flake. When the appliqué is finished you can stitch up the pillow, quilt block or whatever else your making with the Snowflake Applique.


Pin it! Did you know if you hoover your mouse over any image on my blog you can pin it to one of your Pinterest Boards, that way you'll know where it is when you're ready to sew.

Have a great day,


Visit my Website, Etsy Shop, Blog, Facebook

Wednesday, October 15, 2014

Sewing Machine Decorations, Holiday Project #1


We are starting off the holiday projects this week, wahoo! I came up with this one about a month ago and got super excited about the idea. When I sat down to make the project I had so much fun, I know it's a good one when I am laughing and smiling through making it. I hope you have as much fun as I did making these.

If you're like me, you'll be doing a lot of sewing this season making gifts, decorations, and more. Well then, let's start by decorating our machine.  

Everyone's machine is a little different. I have two machines and they are both different in the way they hold thread, display information, etc so you might have to be creative in he way you decorate compared to how I did mine.


I wanted to make sure that my decorations did not hinder my sewing, so think of that when decorating. Your tree could always sit in front of the machine, etc...you get the picture.

It's like we've got three mini projects in this one big project this week. You'll find pattern pieces for the tree here and the wreath here. You can print them all on 8.5" x 11" standard paper. Here's what you'll need and how to make it for each project.


Stuffed Tree

Supplies:
8" x 8" green fabric
Fiberfill
12-15 assorted buttons approx. 1/2"
Coordinating Thread

Instructions:
1. Cut out the fabric according to the pattern pieces.
2. Align the two straight sides of the cone shape. Pin and sew down the side leaving a two inch gap in the sewing. (You will use this for turning and filling later.)
3. Optional: Make a button hole in the middle of the round tree piece approximately 1" in length.
4. Pin and sew the bottom onto the tree. Clip the raw edges very 1/4" and then turn right side out.
5. Fill the tree with fiberfill. Hand stitch opening closed. Hand stitch buttons all around the tree.


6. If you did not make a button hole on the bottom of the tree, then cut a slit in the bottom of the tree approximately 1" if you're going to put your tree on the thread holder.

Note: Take a pencil or stuffing stick and push up in the hole to clear out some space for the tree to sit on the thread holder.


Wreath Ornament

Supplies:
6" x 6" fabric
Fiberfill
7 buttons 1/4 - 1/2" diameter
10" ribbon
12" bakers twine
Coordinating Thread

Instructions:
1. Cut out 2 wreath pieces. Place the two together with right sides facing outward. Sew around the inside circle using a 1/4: seam allowance.
2. Fold the twine in half and tie a knot at the ends. Tuck the knotted ends into the wreath so it will be inside the wreath when you sew around the outside.
3. Sew around the outside circle leaving a 2" gap for stuffing.
4. Stuff the wreath,(you'll probably need to use a pencil or stick to help with this.)
5. With your machine sew the 2" opening closed.
6. Hand stitch the buttons and bow onto the wreath.


Bunting

Supplies:
Assorted Scrap fabric
Thread


Instructions:
1. Cut a strip of fabric that is 1 1/2" wide, length doesn't matter.
2. Go back and cut at an angle to make a triangle. Cut as many triangles as you need using this method from your fabrics.
3. Leave a long tail of thread when you start sewing, sew across the top pf the first flag, place the second flag in front of the first and sew across the top as well. Continue this method until you have the length you need. Leave a long tail of thread again.
4. Using wash tape or another tape that won't leave residue tape the buying onto your machine.

Pin it so you can make it later.


Enjoy!


Visit my Website, Etsy Shop, Blog, Facebook

Wednesday, December 11, 2013

12 Holiday Projects


Hi there, just wanted to recap the 10 uh 12 Holiday Projects of 2013. Somehow I squeezed in a few extra this year. There are tutorials for all of them when you click the links. If you weren't getting these in your inbox every week, then you need to sign up for my email newsletters that way you won't miss any of 2014's projects.


Project #3 Pom Pom Trees


Project # 5 Snowman Ornament


Project #6 Joy Wallhanging


Project #7 Stacked Ornaments


Project #10 Holly Ornament


Project #11 Ball Toy


Project #12 Snowman Mug Rug

Happy Holidays!


Visit my Website, Etsy Shop, Blog, Facebook

Wednesday, November 20, 2013

Stacked Ornaments Project and Making A Simple Wire Loop


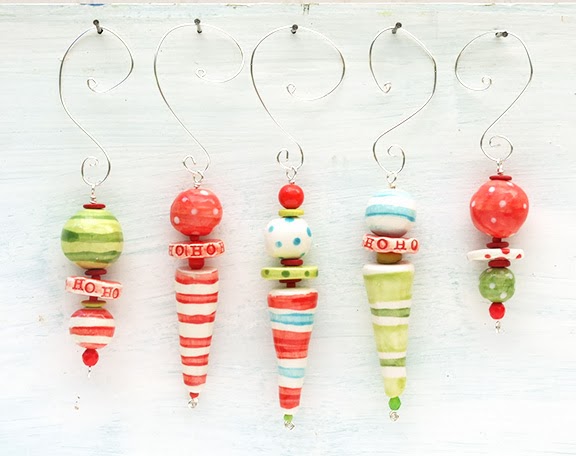
Here's the how to for these fun stacked ornaments a.k.a. whimsical icicles. This would be a fun project to make with the kids.

Supplies Needed:

An Assortment of Beads
20 Gauge Craft Wire
18 Gauge Craft Wire

Instructions:

1. Make a spiral at the end of the 20 gauge wire.

2. Start stacking beads from smallest to largest on the wire until you are happy with your ornament.

3. Make a simple wire loop (see below) just above the last bead. Trim any excess wire.

4. Using the 18 gauge craft wire make an ornament hook (see below).


You can pin it or print these tutorials for later reference.


Enjoy!


Visit my Website, Etsy Shop, Blog, Facebook

Wednesday, November 13, 2013

Joy Wall Quilt


It's week number six of my holiday projects and this weeks project is a wall quilt. I actually I think I will hang mine on a door, but you could use it on a table as well. Theres a PDF to download with all of the full size appliqués for the quilt.

Here are the basics:
Background and backing 1 yard
For Joy and Berries 1/3 yard red
Holly Leaves 1/8 yard of two greens
Binding 3/8 yard

This quilt is made in my It's Christmas! fabric available in stores now. I carry my Jolly Holiday fabric from last year in my Etsy shop and there's black, red, and green there as well.

To assemble, cut the background of the quilt to 15" x 36". Using Heat n Bond Lite or another fusible webbing fuse all of the pieces onto the quilt top, using the above picture for reference.  I went around the edges with a blanket stitch to secure them, but you could use any stitch you would like. Quilt and binding is all that is left.

I hope you enjoy this weeks project!

Visit my Website, Etsy Shop, Blog, Facebook

Friday, November 1, 2013

Snowman Week is Coming

It's November! I have no idea where October went but it blew by this year. Were in November, it's the first and to kick it off I took the boys to school this morning and headed straight to Starbucks to get my first peppermint mocha of the season. It's so good, I have self imposed peppermint mocha drinking rules, and one is that it has to be November before I start drinking them, second, I CANNOT go to Starbucks everyday and get one as much as I would like too. I make them at home on those days. :) And by January 1st, I am so sick of peppermint mochas I never want to drink one again. 

I don't know I am feeling like I could almost get out some Christmas lights and string them up today, I'm feeling so festive. It's getting cold here, it's sweater weather, and it's dark more. Maybe this weekend, after I spend some time cleaning up my studio, I'll hang some lights.

Okay, but enough about my holiday excitement, well, this still is about my holiday excitement but now it's more about beads and sewing. I am declaring next week Snowman Week. Won't you join me? Snowmen are just so dang cute and fun that I feel like we should dedicate an entire week to them.  I will be featuring a new snowman project everyday here at the blog, all week long. I'm going to have a snowman sale as well(more details on Monday). It should be good fun. And yes, I will be drinking peppermint mochas everyday as well. You'll probably catch shots of them on Instagram or Facebook. :)

Please come back on Monday won't you, I promise it will be fun.

Have a great day,


Visit my Website, Etsy Shop, Blog, Facebook

Wednesday, October 30, 2013

Stuffed Ornament and Stuffed Ball Toy Tutorial


I've got a two projects for one this week. 

This weeks holiday projects is this little ball ornaments tutorial. The ball is made from 12 pentagons sewn together. This makes this pattern really easy to adjust to any size you would like. The pattern pieces below are are all ready for you to print in the size of the ornament, which is a 4 inch ball. The snowflake embellishments are included as well in the printable pieces.


While I was sewing up my ornament, I decided to make my nephew a larger ball for rolling on the floor. I have included the larger pentagon for this in the printable pattern pieces as well. The play ball measures approximately 8 inches in diameter.

Once you sew up one, you will want to make more. Here's the how-to....

Supplies: 

Fabric scraps( size and amount depends on what size ball)
Fiberfill
Needle and Thread or Sewing Machine
2 colors of felt 3" x 3" For Ornament only
Ribbon measuring approximately 24" For Ornament only
1 small ceramic button 3/4" For Ornament only

Instructions:

1. Cut 12 pentagons using the Pattern Pieces. A 1/4 inch seam allowance is built in to the piece.
                                     
Basically, all of the pieces will be sewn together to create the ball. So it doesn't get confusing sewing all of the pentagons together I think it's easiest to sew the two halves of the ball separate and then join the two middles together. Also, I find these almost just as easy to hand stitch if you're looking for a project to take on the go.

2. Choose one pentagon to sew five of the other pentagons edges to with right sides facing together.


3. Once the five seams are sewn, go back and sew the right sides together of the five pentagons together as shown below.


4. You now have one half of your ball sewn. Set this one aside and sew the second half of the ball following steps 2. and 3. again.
5. Now it is time to join the two halves together. They will fit together in a zig zag pattern. There's a black and white drawing below to help you see the pattern. Pin the right sides together all of the way around the ball to make sure you have it joined correctly. Once you do, sew the edges together, leaving a couple a section open for turning and stuffing.


6. Clip and corners and loose threads. Turn the ball so that it is right sides out and fill with fiberfill.
Hand sew the opening closed.

7. For the ornament version of the ball, cut the ribbon in half. Tie a bow with one half of the ribbon and the other half will be folded to make the ornament hanging loop. Tack stitch these onto the sewn ball along with the felt flakes and button.

Enjoy!
Here are the printable Pattern Pieces again.

Visit my Website, Etsy Shop, Blog, Facebook
Pin It button on image hover