Showing posts with label free pattern. Show all posts

Monday, June 3, 2019

Free Pattern - Ideas Tote Notebook Cover and Pouch


Hello! I've got a new pattern for you today. If you're doing any summer traveling this might be what you need to take with you to jot down the inspiration you get while away. This pattern was originally going to be in my book, Sew Small 19 Bags to Sew. We would have had to change the name to Sew Small 20 bags to Sew! There just wasn't enough rom to add it in. So I am sharing it here today.


It holds a standard 6" x 9" stenographers notebook. It has a zipper pouch so your pens and pencils will stay put while moving around. Here is the correct size notebook on Amazon. 


The printable pattern and instructions can be found here.  I hope you enjoy making it.

Enjoy!

Jennifer


Another fun travel bag pattern! The Happy Camper Bag


Visit my Website, Etsy Shop, Blog, Facebook

Thursday, July 3, 2014

House Hot Pad Project


Supplies:
7" x 14" house fabric
7" x 10" roof fabric
3" x 5" window fabric
3" x 3" door fabric
6" x 12" fusile fleece
3" x 8" fusible webbing
4" ribbon
coordinating thread


Instructions:

Click here to get the pdf pattern pieces.

1. Cut two roof pieces with right sides facing and cut 2 house pieces. Trace the windows and doors onto fusible webbing and then press on to the corresponding fabric. Cut the pieces out. Arrange and iron the appliqués to one of the house body sides.


2. With right sides together arrange the roof on to the top of the house piece. Sew across using a 1/4" seam allowance. Open and press the seam.


3. Using the sewn house as a pattern piece cut out a piece of fusible fleece and iron it to the back of the house. Pin a loop of the ribbon to the top.


 4. Place the front of the house on top with right sides together. Sew around the outer edges leaving a 3" gap for turning. Clip any corners and turn right sides out. Press.


5. Tuck the raw edges into the opening and hand stitch closed.


Hope you had fun,


Visit my Website, Etsy Shop, Blog, Facebook

Friday, March 29, 2013

Dolls Apron Tutorial


 I made up this little apron for Rhubarb. Because it ties in the back it will fit just about any doll or stuffy that is around 16-18 inches tall. It's an easy pattern to adjust the size if you need to alter it. Here's the how-to.


 Supplies:

1/4 yard cotton quilting fabric
2 3/4" buttons
coordinating thread

Cutting Instructions:
Cut 1 strip of fabric measuring 3" x 44"
The remaining piece should be 6" x 44" if you're using a quarter yard piece of fabric.


 1. Fold the largest piece of fabric in half and press. On the longest side with the raw edges, sew a gathering stitch. Pull the threads to gather the apron piece so that the gathered side measures  9 inches. Set aside.


2. Take the remaining piece of fabric and fold it in half so the right sides are facing outward. Press this seam.


3. Open this piece up and press each raw edge inward approximately 1/4 of an inch.


4. It should now look like the above image. Next, cut a 12 inch piece off of the folded fabric.


5. Sew down the edge of the 12 inch piece. Cut this piece of fabric in half so that each one measures  6 inches. These are the two straps of the apron.


6. With the remaining strip of folded fabric, tuck in the raw edges at the ends. Pin in place.


 7. Find the center of the apron piece by folding it in half and marking it with a pin. Next, find the center of the long tie by folding it in half and marking it with a pin. Line those pins up and insert the raw gathered edge into the center of the tie. Pin in place.


8. Go back and tuck each strap into the folded fabric and pin into place as well. Notice when pinning, that one side of the strap is lined up with the edge of the apron.


9. Starting at one end of the tie, sew all of the pinned edges.


10. Fold the apron straps upward and tack into place with a needle and thread. Sew on two buttons and you are finished.

Have fun!


P.S. You can see my Otis and Rhubarb sewing pattern here. The fabric used in this pattern is from my Extraordinary World fabric collection from In The Beginning Fabrics.

Let's Connect and don't forget about my free Whimsical Flower Pins Pattern.


Visit my Website, Etsy Shop, Blog, Facebook

Friday, October 26, 2012

Felt Pickle Pattern


My new "Pickles The Elephant" sewing pattern just came out this week! Elephants usually go wild for peanuts but you can guess what this elephant likes. So I figure if your sewing up Pickles the Elephant, she might need some pickles as well. Here's the free tutorial and you can print the PDF version here.

Supplies Needed: 

4" x 6" rectangles of green felt, a lighter green embroidery floss, a sewing machine or needle and thread, and some fiberfill

Instructions:

Start by cutting 4 of the pickle pieces from the felt.


Pin two pieces together and sew from the center of the top to the center of the bottom. Repeat this step for the remaining two pieces. This stitching can be done by machine or hand.


Next join the two sets together. Do this by inning two of the un-sewn sides together and then the remaining un-sewn sides together. Make sure all four of the top pieces are at the top of the pickle and the same for the four bottom pieces.

Sew the two sides just as you did in the previous step. This time leave a 2 1/2" gap in the middle of one of the seams. This will be for turning.


Clip the edges of the felt every 1/4" and then turn the pickle inside out. fill the pickle with fiberfill. Hand stitch the opening closed.


With the green embroidery floss, tie a knot in the end of the thread and start at the top of the pickle. Send the needle through, leaving the knot and loose threads exposed. Stitch up and down down the side of the pickle until you get to the bottom center. Turn your needle around and stitch up and down back up to the top. Continue these stitches all the way around the pickle. Once your stitching has finished, bring the needle up through the top center again. Tie a knot and trim the excess floss. Be sure to leave about 1/4" of floss for the stem.

Have fun!


Visit my Website, Etsy Shop, Blog, Facebook, or Studio and Gallery

Thursday, October 18, 2012

Elmore Penguin, A Free Pattern


Elmore is headed your way from the north pole. You say penguins usually live at the south pole?  This guy took a plane(penguins can't fly) to the north pole. He resides there with all of Santa's Elves. He helps with all of the outdoor duties like hanging Christmas lights. He likes the cold.

When you print the PDF you'll see a logo from Fairfield Fiberfill, that's because this pattern is going to be on their site as well.  I'm their featured artist this month and I'm super excited about that. Elmore will also be hanging around the Fairfield booth at Quilt Market, yay!

Click on the Elmore picture below to download the free PDF. You can also find a link in the side bar of   my blog, if you need to print again, another day.


Have fun!


Visit my Website, Etsy Shop, Blog, Facebook

Sunday, August 26, 2012

Zipper Pouch Tutorial, Easy and Free!


Today I have a tutorial for you! There are a lot of folks out there terrified of putting zippers in bags. I promise you, this is an easy, easy method. There are lots of photos to follow so sit back and enjoy the project.


Supplies: 

2 rectangles measuring 5" x6" in the outer fabric
2 rectangles measuring 5" x 6" in lining fabric
9" zipper or longer
9" 1' ribbon
7" ball trim
1.5" split ring(key ring)
1" button
assorted 3' x 3' felt or velvet scraps for flower,(not shown in photo)


Start with one of the pieces of outer fabric. Place the zipper above the fabric so that both ends are extended past the edges of the fabric.


Flip the zipper over so that the zipper head is facing down, as shown in the photo.


Line the edge of the zipper up with the edge of the fabric. Pin in place.


Place a piece of the lining fabric, face down, on top of the pinned zipper. Make sure the outer and lining side edges are lined up. Pin the fabric in place.


Using your zipper foot on your sewing machine sew using a 1/4" seam allowance. The edge of your zipper foot should line up with the edge of your fabric.


This is what it should look like.


We've got half of the zipper in place! Yippee! Enough celebration, it's on to the next side.


Keeping the fabric pulled back from the zipper as shown in the last photo, lay the zipper onto the remaining piece of outer fabric. Once again make sure that the zipper head is facing down. Line up the side edges with all three fabrics as well.


Pin the zipper onto the outer fabric and then the remaining lining fabric to the zipper. The lining should be facing down as shown in the photo. Sew along this seam just as you did the first side of the zipper.


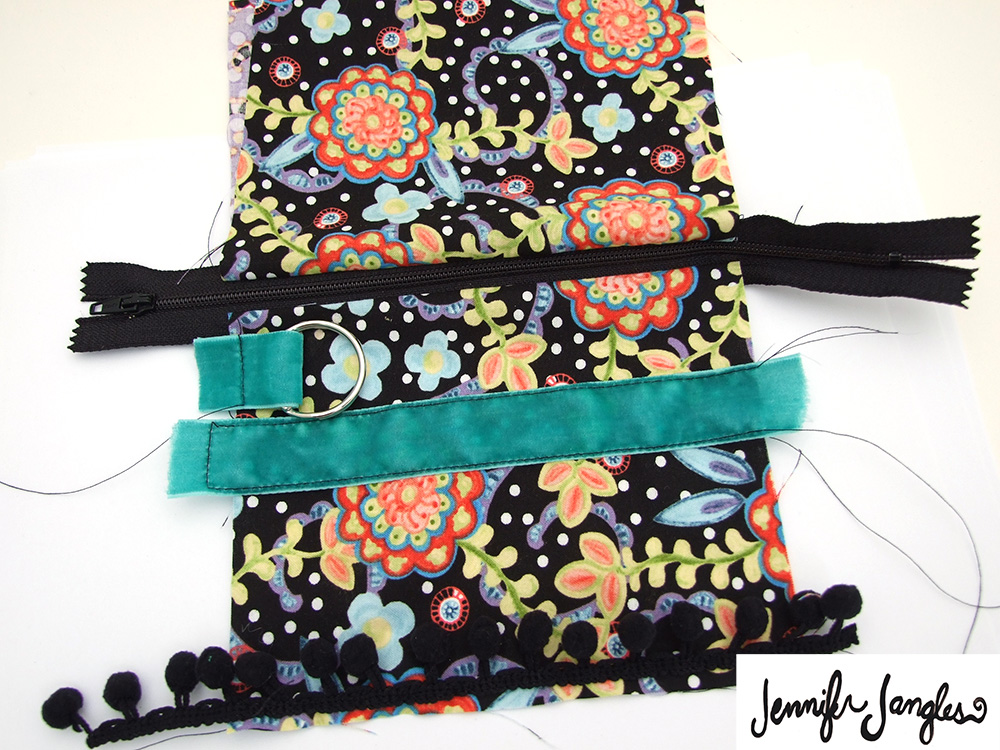
Now that your zipper is in place you can breathe a sigh of relief. You did it! Now it's on to the fun part, embellishing. Place 7" of ribbon about one third of the way down the bag and in in place. With the remaining ribbon slide the key ring on and fold in half. Pin this to the top side of the bag front. Make sure of two things; 1. the ring is facing in and is not within a 1/4" of the side 2. The ring is on the same side of the bag as the zipper pull. Last pin the ball trim across the bottom facing inward as well. Whew!


Sew everything in place. Now unzip the zipper 2/3's of the way.


Now arrange the bag pieces so the two outer bag pieces are right sides facing and the two lining pieces are right sides facing. Pin everything together. When you are ready to pin the zipper sides, fold them in half. Make sure that the teeth of the zipper are facing the outer bag fabric pieces. (see below)


Sew around all of the edges. Leave a three inch section at the bottom of the lining for turning.


Now let's clean this baby up! Clip the corners. Trim all of the excess ribbon, zippers, etc.


Turn the bag inside out. Before you stitch that opening closed, lets add the flower button.


I went to my scrap bin and found a piece of velvet and felt that coordinated. I placed the velvet behind the button and cut out the flower shape. Next I placed the felt behind the velvet and did the same thing. I sewed all three layers together and then tacked it to the bag. While you have your needle and thread out, sew the opening closed in the lining. Push the lining into the bag and you're all set!


I hope you have fun making lot's and lot's of the bags. Please let me know if you try this how-to, I would love to hear about your experience.

If you're curious about the buttons or fabric...here's the info

Ceramic buttons can be found here and the fabric is from my Tussie Mussie line from In The Beginning Fabrics.

Have a great day,


Visit my Website, Etsy Shop, Blog, or Facebook,
Pin It button on image hover