Tuesday, March 31, 2015

Creativity Tips - Creativity in the Morning


Did you know most people are usually more creative in the mornings before all those things you have to do creep in to your head? I do my best to get to a local coffee shop a few times a month to draw and drink coffee while I am still waking up. Try something creative first thing in the morning and let me know if you can see a difference.


Friday, March 27, 2015

Studio Updates


It got warm here, in a weird way one day it was 40 and then the next it was 86. I guess were missing the 70's this year. It's also been raining like crazy, and so I have basically had a mud puddle outside my studio door for a while now.

The plan is to have a cute little garden outside the door. That's as far as I have gotten...I have been scouring pinterest for ideas but for now I am overwhelmed with possibility so I will do nothing.


Well nothing except my little walkway, I knew I needed it. And with Ruby (in the previous photo) next to me the whole time, I was able to do some terracing. She helped me dig. She likes to find tree roots because they are buried sticks and when your a dog it doesn't get better than that.


So now I have a little walkway, I'm still collecting a few rocks to finish off the front. I'll keep you posted on the planting, if it stays warm much longer, I won't be able to stay out of the garden centers for long.

Have a great day,


Tuesday, March 24, 2015

Embroidery Sneak Peek


A lot of you have been asking about my embroidery lately, I've been posting some on Instagram. I am in the final stages of getting some PDF patterns finished. This is my favorite right now, it's an 18 x 18 pillow top. I'm sewing the border on it today.

Stay tuned for some fun embroidery posts coming.....

Have a great day,

Monday, March 23, 2015

Sewing Basics Video, Filling with Fiberfill

I've been working on some videos for my Jennifer Jangles You Tube channel, here's one on filling with fiberfill. Hopefully I'm giving you some good tips to help when you are stuffing your softies.


Have a great day,

Friday, March 20, 2015

Calculating Yardage, Fractions to Decimals

Here's a handy dandy reference guide for when you are calculating your sewing projects and yardage.  You can pin this on Pinterest and then when you need to remember what the decimal equivalent is to the fraction of an 1/8 yard it's all right here!


Enjoy!


Wednesday, March 18, 2015

Bunny Applique Mini Quilt


As promised, my Bunny Appliqué Project is finished! Why is it that hand stitching always takes longer than planned?  This little quilt is 12" x 14". All of the appliqué pieces can be found here.
Square sizes are as follows;
Bunny Squares 6 1/2"W x 7 1/2"H
Carrot Squares 2 3/4"W x 7 1/2"H
Patterned Squares 4"W x 7 1/2"H


After appliquéing the bunnies and carrots to the corresponding squares, I used an appliqué stitch to go around them with coordinating thread. I decided to quilt it by hand stitching with embroidery floss. 


If you decide to make a bunny quilt show me on instagram,  #jenniferjangles

If you're new to appliqué, here is a tutorial on the basics.

Enjoy!


Tuesday, March 17, 2015

Applique Bunny Projects


Look at all of these cute bunny appliqué projects coming in! These have all been posted on my Jennifer Jangles Facebook page. I'll admit I am finishing up mine as we speak. It will be here on the blog tomorrow.


Here's the appliqué if you want to sew something up yourself. Thanks so much Cary, Deb, Kerry, and Bradlee for sharing your pictures with me!


Have a great day!


Friday, March 13, 2015

How to Applique


Let's talk appliqué....It's one of my favorite things to do. Here are the steps to create a fabric appliqué using paperbacked fusible webbing. You'll need an appliqué pattern, paper backed fusible webbing, a pencil, scissors, and a sewing machine with thread.


I am a designer for Thermoweb but before I was, they were still my favorite fusible to use. My go to fusible webbing with paper backing is Heat n Bond Lite. It's like it's name says, it's light weight and not very noticeable when used. 

You'll want to trace each patterns piece of the applique on to the paper side of the product. Be sure to leave about a quarter inch around all of the tracings.


Cut out the pieces roughly, at this point you don't want to cut on the line, we'll do that later.


Choose your fabrics for the appliqués and iron the webbing side down on to the fabric. I use my iron on the hottest setting with steam. Let everything cool and then cut out the appliqué on the pencil lines. The paper gives everything a bit of stiffness so it's easier to cut out detailed work this way.


If there are smaller pieces that go on top of your larger appliqué pieces, you'll want to iron them on first. Do this by peeling off the paper and then arrange the pieces to your liking. Press in place with the iron. Press straight down with your iron, don't move it back and forth, that might push things around. If it doesn't all fit under the iron, pick the iron straight up and move it over and press again.


Once the appliqué is ready to be placed onto your background fabric, peel the paper off and arrange and press just like you did the previous appliqués.
  

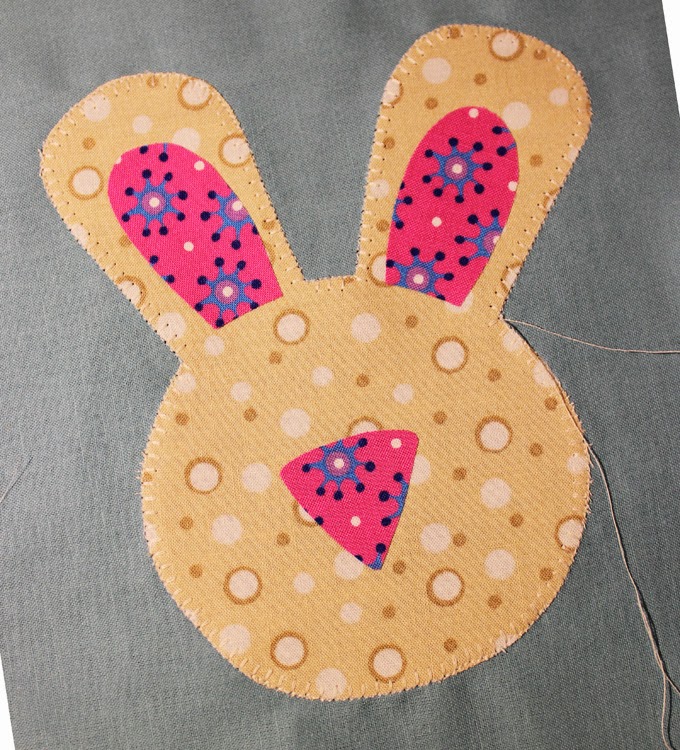
Now you are ready to sew the appliqué to secure it permanently. I like to used an appliqué stitch. It's also some times called a blanket stitch. A zig zag stitch works well too. You can see my setting here on my machine.


I place the needle in so the outside of the stitch falls, just on the outside edge of the appliqué.


Sew all of the way around the outer edge of the appliqué. 


Now to tie the threads to prevent unraveling, flip the appliqué to the backside. There will be two threads. Use a sharp point of some kind, I like my seam ripper for this, and pull the stitch up that is right next to the loose end. One of the ling ends of thread from the front should come through to the back. If you can't find the right stitch, wiggle around on the loose thread on the back, the stitch next to it will usually start to come up. That's where you'll want to pull. Pull the other thread the same so you end up with four threads on the back of the fabric.


Tie these in a knot and then trim the excess thread. Sew any other appliqués down, switching thread colors if necessary until it's finished.

I'll post pictures later of my finished appliqué. It's still top secret since it's part of my bunny appliqué challenge. The free bunny appliqué is here, if you want to try and appliqué project for your self.

Here's a pin-able tip page to pin and refer to later.

Have a great day,


Sunday, March 8, 2015

Friday, March 6, 2015

New Sewing Patterns are Here


Hey Hey, i've got four new sewing patterns. They just got here from the printer yesterday. It's been awhile since I sewed up some animals for you, but there are lots now.

There's Daisy Hedgehog that you might have seen at the Sewing Party in September. She is now a paper patterns and available to everyone.


I think this pattern is my favorite of the four, it an appliqué quilt with only four blocks. Easy peasy to put together. It's 36" x 48" so it could also be a wallhanging.


Petunia Peacock Pin Keep is a sweet little peacock standing 7" tall. Her ribbon is for the prize she won at the state fair for her pin collection. Have fun storing your pins and needles with her.


And last but not least is Little Love Bunny. He's been so popular that he's been included in the paper line of patterns too.

As you may have seen, I am adding to my video stash over on You Tube. Here's one I did showing you my four new patterns. I just figured sometimes it's better to get to see them in video than just on their covers.


All four patterns are available as paper and PDF patterns.

Have a great day,


Thursday, March 5, 2015

Bunny Applique Challenge


I put out projects from time to time. I am working on a project right now for you using this appliqué and it will be out soon. But I thought it might be fun to see what you might do. You are creative, let's see where you would use this bunny appliqué. You can print out the pattern here

What would you make? Table runner, basket, quilt.....

Post it on my Facebook page or #jenniferjangles on Instagram so I can see and show everyone else. You can always email me a photo as well any site you want me to link it to. Can't wait to see what you come up with!

Have a great day,


Wednesday, March 4, 2015

Studio Redo, Converting the Garage into a Studio


I have been terrible about showing photos of my studio redo, it's been a very long process, because I have been working on my studio as I slowly redo it. Back in the fall, I mentioned it would be starting.... but now I am back with some pictures of the work we have done so far.

Let me back up and say, my old studio, as bright and pretty as it was had two big problems. The biggest of problems....no windows. I really was going crazy spending my days in a room without windows. See when we bought our house, my studio was here and not in the house. As busy and fun as it was to have the store and the studio, it was a TON of stress and not really where I wanted my business to be. Nik and I had lots of conversations on how to remedy the studio problem, moving vs. not moving, etc. We love our house and especially our yard, and we never actually used the garage for our cars. The last two years it had been full of camper parts.

So we decided that we would covert the garage in to my studio. Here's what we did to get the bones of the studio.


First things first, I painted it white. Oh ya, forgot to mention the second problem with my old studio was the color. It was beautiful too look at, but incredibly hard to take pictures in there. I am a huge fab of white backgrounds to make colors pop, so I decided the studio should have a white background. There's color coming, I promise.

We built a giant closet along the back wall. That will store all of my show displays, patterns, etc.


 Next, we put in a door, Nik and I were hi giving on this one. We have never cute a hole in a wall, let alone put a door in, we were very proud of ourselves. It actually was pretty easy after watching a few YouTube videos to get some help.

Feeling so handy we decided to put in a window as well. There was one already, but we added a second.

Then on to covering up the garage door.


I did not want the signs of a garage door, but I also wanted to be able to convert the studio back to a garage if we ever decided to move. Darn it! I am kicking myself for not taking pictures of this, but anyway, we left the door up. We had a garage door specialist come out and remove the tension from the door. We did this because my dad warned me that those springs can kill you if they pop, not something I wanted to deal with. After the spring tension was released, I removed the track and the opener from the ceiling. I put them those parts in the big storage closet. Then I sealed around the garage door and built a wall. I insulated and drywalled it, something else I had never done. 

It doesn't look like a garage at all! 


Heres' the view of the outside. I've got plans to turn this into a little terraced garden and sitting area. I am waiting on a warm up for that.

Stay tuned, I will be back soon with what I have been doing to the inside.

Have a great day,

Pin It button on image hover