Showing posts with label projects. Show all posts

Wednesday, October 9, 2013

Scrappy Happy Scarves


Let me tell you had much fun I had making these. I seriously want to start up a scarf making business, hit the road and do shows selling them. I had to reel it back in because I might have too much going on to fit that in, but let's just say I was excited. These are FUN to make!

The scarf body is knit, so it's super soft around your neck. Then it's time to clean out those scrap bins, anything goes with these scarves.


The scarves have been so popular that they are now available as kits. The kit comes with the pattern as well as the knit, trims, tulle, and felt. You just need to add scraps. Each scarf is unique, how fun is that?

Don't want a kit? You can get the pattern free by signing up for the Jennifer Jangles newsletter. It will be delivered to your inbox.


Have a great day!


Tuesday, March 12, 2013

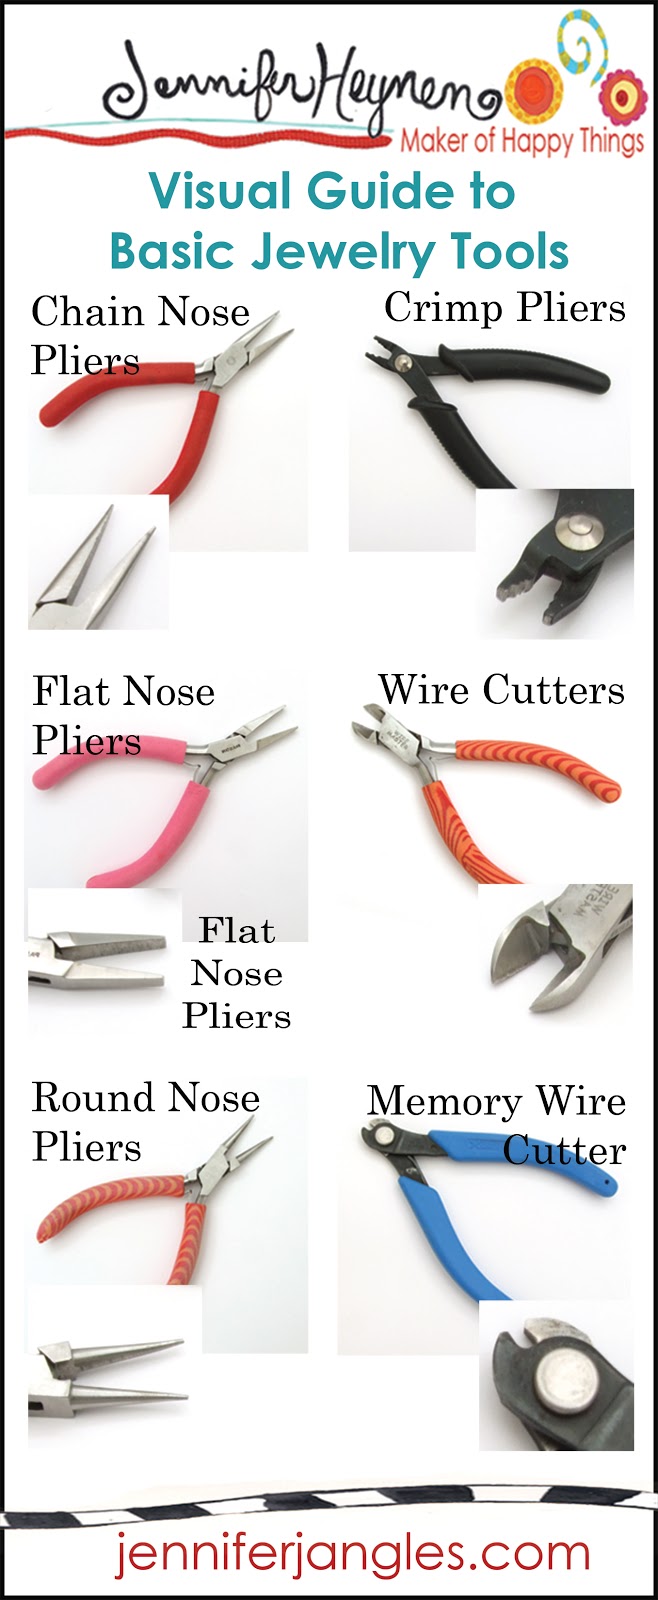
Jewelry Making Basics


Hey, Hey,

Have you seen all of the infographics on Pinterest lately? If not, they are basically a visual guide to learning something. They are perfect for me because as you could probably guess I am a visual learner. I have found myself pinning a lot of them lately.


At the same time, I have been designing loads of jewelry. My jewelry designs require pretty basic skills to put together. I had an ah ha moment and realised I should make some infographics for the basics.


I made them for you so you could print them out and hang them on your studio wall or you could pin them on one of your Pinterest boards. Either way they are pretty little reminders of the basics.


This one is going to be my new computer wallpaper, because when I am ordering beads online I NEVER have it in my head how big beads are in millimeters.


I made it so if you click on the image, it will enlarge and you can print it on a single piece of paper. Plus if you're reading this at my blog, you can run your mouse over the top for a pin it button.


Enjoy!


Let's Connect,

Visit my Website, Etsy Shop, Blog, Facebook

Saturday, August 14, 2010

Swing Necklace

Photobucket

Hey, Hey,

I made a new necklace. I am loving it an wearing it right now.

It was super simple, and here's what you need:

3 Jangles ceramic pearls
2 brightly colored cane glass rings5 assorted size and colored coconut shell discs
or
one of my new bead sets on Etsy

6" 18 gauge gunmetal wire
18 inches 2mm x 4mm gunmetal chain
2 4mm gunmetal jump rings
1 6mm gunmetal spring clasp

Tools:
Needle Nose PliersChain Nose Pliers
Wire Cutters

Instructions:
1. Take the end of the wire in your needle nose pliers. Turn the wire around the pliers several times to make a loop.

2. String your beads on in any order you would like.

3.Trim the excess wire to an inch in length. Grab that end in the pliers and twist a loop to match the first loop.
4. Open up a jump ring and attach one end of the necklace to one end of chain. Do the same on the second side.

5. Attach the spring clasp to the back of the necklace.

That was super easy, eh? So I have put several sets of these beads in my Etsy shop. I also put some longer sets that would make super cool bracelets, some pairs for earrings, and pendants.

Have a great day,
Jennifer

Thursday, July 22, 2010

Seen Me Lately?

Hey, Hey,

Seriously, where in the heck has the week gone? Sorry my bloggy followers, things are a bit busy around here and I just don't have enough time to get everything done. In some ways I am feeling calmer about work in the studio, I feel like things are getting finished, but then I look ahead at my schedule for the rest of the year and I freak out again. I will explain more on my schedule in another post down the road.

But check all these great pubs that have come out recently. They all have my beads! Yippee!

First is Creative Jewelry, this magazines is a can't miss of the summer. The publish it once a year and it is always full of great stuff. The eclectic bracelet above is in the magazine.


Here is another great piece, well a sneak peek at a great piece. This was designed by Jamie Hogsett. Thanks Jamie! It's fabulous, like all of her jewelry. She has written many books, I have several of them and the are all fabu.

You can find that project in the summer issue of Stringing.

Last but not least, here is a book I am dying to get my hands on! It is out and Margot is sending me a copy as we speak. Actually, I think it is two copies so I can give one away here on my blog, wahoo! Stay tuned for more on that later. But I got to design a project for Bead Chic and I can't wait to see it in print.

Alrighty, that a lot of information for you to take in. I think I will stop here. I am going to head back out to the studio where I have two kilns firing and a pile of things to glaze.

Talk to you soon,

Monday, July 27, 2009

My New Necklace

Hey, Hey,
The nice folks at ArtBeads.com sent me some ICE resin and other goodies so that I could show them off in my blog. I thought, why not, I am always up for a project and I love ICE resin. So I made up a cute little polka dotted bezel and put my dog Otis' picture in it. I also found a little silver dog bone charm to hang on the bottom of the bezel. To finish it off I chose these size 11 lime green seed beads to use for the necklace. So what do you think?

Wednesday, July 15, 2009

Free Project-Flower Pendant


Supplies:

Instructions: Before stringing the necklace, you will need to make the pendant. Assembling the pendant:
    1. Take your piece of silver wire and make a simple wire loop at one end. Before closing off the loop string on the leaf charm.
    2. String 12 green seed beads onto the wire alternating colors.
    3. Next slide on a silver ball, the large flower, and another silver ball.
    4. Just above the top of the last silver ball make another simple wire loop. This one can be small, because it just needs to slide onto the beading wire.
    5. Trim the excess wire. You are ready to assemble the necklace.
Stringing Instructions:
  • Start by crimping one end of the 24" of beading wire to the silver clasp.
  • String 20 seed beads, alternating colors. Add a Czech bead and continue with ten more seed beads.
  • String a silver ball, a small flower, and another silver ball onto the wire. Continue by stringing ten seed beads, a Czech bead, and ten more seed beads.
  • Next, string a silver ball, a leaf bead, a second silver ball and ten more seed beads. Now you have half of the necklace strung.
  • String on the pendant that you made and continue with the second half of the necklace.
  • To finish, crimp the second half of the silver wire to the end of the wire. Trim the excess wire.
  • Friday, July 10, 2009

    Free Project-Three Ring Necklace


    Three Ring Instructions

    The Rings in this necklace have denim blues, avacado, a cobblestone brown, and a chocolate brown. I can see this necklace worn woth blue jeans or a brown work suit.

    Saturday, December 20, 2008

    Earring Project Flashback

    Here's a snazzy pair of long and dangle-ly Jangle-ly earrings.

    I had a project in my email newsletter today for an necklace. I couldn't resist making a pair of matching earrings. I thought I would share the project instructions with you.

    Supplies Needed:
    1 pair of Seaside Jangles Ceramic Hoops
    2 10-12mm wooden discs
    4 Montana blue 6mm Crystal bi cones
    8 Ecru size 6 seed beads
    4 inches 20 gauge sterling silver wire
    2 silver 4 inch headpins
    2 ear hooks

    Tools Needed:
    chain nose pliers
    wire cutters

    Instructions:
    Step 1. Start by string a seed bead, a wooden disc, a crystal, and another seed bead onto one of your headpins. Make a simple wire loop just above the beads and slide it onto one end of the ceramic hoop before closing it. Trim the excess wire.

    Step 2. Make another small simple wire loop with your silver wire, slide it onto the remaining loop on the ceramic hoop and close.

    Step 3. Next, string a seed bead, a crystal, and another seed bead onto the wire. Just above those beads make a simple wire loop. Trim the excess wire. Attach the ear wire to the loop you just made. Congratulations, you have an earring.

    Step 4. Because you don't want to walk around lop-sided you'll need to make another earring. Follow steps1-3 to do that.


    Enjoy your project,
    Jennifer

    Friday, September 12, 2008

    Flower Lariat

    Simply Beads copyright 2008

    Here it is my other, and favorite project in the October Simply Beads magazine. I really like this necklace for many reasons and here they are:

    1. It's lime green, a color that I am obsessed about.
    2. My flower beads are some of my favorite beads that I make.
    3. It has a really cool finding from Kristi Evenson of Coliebug beads.
    I am including my photo of the necklace too, because I think it shows the use of the finding better and that's what I love most about this necklace. Kristi make different styles of these rings that are super cool. She makes each one individually from sterling silver, she antiqued mine. She is a glass bead maker, a silversmith, and a jewelry designer, if you ever get a chance to see her at a show you will fall in love with her work, I have.

    Thursday, April 10, 2008

    Polka Dot Fun


    Good Morning! I thought today I would give another peak of my book, Ceramic Bead Jewelry. This is one of the projects you can make. It is one of my favorite pictures in the book. I love the contrast of the black and white on the green. The polka dots are stamped into the clay and then an underglaze is rubbed into the crevices. I wiped the black off everywhere else. This bead has a matte underglaze on it so it's protected but not as shiny as some of my other beads. It's a nice look.

    Actually since I came up with these projects for the book, I have been using some matte glazes and am really happy with the effects. In late summer, I will have some new beads ready to go with this look. I will talk more about those later, once I can get some pictures taken.

    It's back to making beads for me!
    Have a great day,
    Jennifer

    Tuesday, November 27, 2007

    Earrings, Project No.10

    Earrings
    Instructions for Holiday Earrings

    Supplies needed:

    • 2 holiday charms
    • 2 seed Beads
    • 2 sterling silver ear hooks
    • 4" of 20 gauge sterling silver wire
    • round nose pliers
    • chain nose pliers
    • wire cutters
    1. Begin by making a wire loop on one end of the sterling silver wire. String on one of the seed beads.
    2. Right after the seed bead make an second wire loop. Before closing the wire string on one of the ceramic charms. Close the wire loop and trim the excess wire.
    3. Open the loop on the ear wire and slide it onto the first wire loop you made. Close the loop.
    4. Follow steps 1-3 again to make the second holiday earring.

    Pins and Magnets, Project No. 9

    Project Instructions
    Supplies needed for magnet or pin

    1 ceramic embellishment 1 flat backed magnet or pin

    1. Glue pin or magnet on back!
    2. I know I didn't really need instructions for that did I? There so easy you can make a ton for gifts, your holiday craft shows, and more. I like to use tie tacks for the pins and rare earth magnets work great for the magnets. Those are the really tiny super strong ones.

    Memory Wire Bracelet, Project No. 8

    Project Instructions
    Supplies needed for bracelet
    • 3 Bright original ceramic beads
    • 1 Periwinkle 1/2" ceramic disc
    • 2 lime 1/1" ceramic disc
    • 1 turquoise 1/2" ceramic disc
    • 16 silver balls 4mm
    • Approximately 16" memory wire
    • Approximately 16" black rubber tubing
    1. To begin, grab the end of your memory wire at the tips of your round nose pliers. Turn the wire to make a loop. Trim any sharp wire ends.
    2. String on a silver ball.
    3. Cut the rubber tubing into 1 1/2" - 2" pieces. String a piece of tubing onto the memory wire.String a ceramic bead with a silver ball on each side. Continue to string a piece of tubing, ball, ceramic, ball, until the bracelet has all of the beads on it.
    4. Finish by stringing on one last silver ball. Trim the wire leaving approximately 1/2 inch of wire at the end.
    5. Create a loop just as you did in step one. Keep rolling up the wire until the beads are snug.

    Pin, Project No. 6

    Project Instructions
    Supplies needed for one pin
    • 1 large ceramic bead
    • 12 inches of 20 gauge sterling silver wire
    • 2 coordinating 10mm glass beads
    • 2 coordinating see beads
    • pin finding with flat back
    • jewelry glue
    • flat nose pliers
    • round nose pliers
    1. Fold the wire in half. With the folded end in the tip of your round nose pliers and turn it to make a spiral.
    2. String one of the glass beads and the ceramic bead onto the two ends of wire.
    3. Now string a seed bead, a glass bead, and one more seed bead onto one of the ends of wire.
    4. Grab that same end of wire and twist into a tight spiral.
    5. With the remaining wire fold it in half and send the loose end into the ceramic bead.
    6. Fold the wire so it is flat. Grab the end in the tip of your round nose pliers and twist into a loose spiral.
    7. With jewelry glue, secure the pin to the back side of the large ceramic bead. Let it dry completely flat.

    Children's Necklace, Project No.5

    Project Instructions
    Supplies needed for a necklace
    • 1 small character ceramic focal bead
    • 2 round 8mm large hole silver plated beads
    • 1 spring ring clasp
    • 14" 2mm rubber cording
    • 2 2mm coild terminators
    • chain nose pliers
    • scissors
    Instructions:
    1. Insert one end of the rubber cording into the coil terminator. Press the end of the coil into the rubboer cord with your pliers.
    2. String a silver ball, the focal, and another silver ball onto the cording.
    3. Determine what length of necklace you would like and trim the excess rubber cording.
    4. Attach the second terminator as you did the first, in step 1.
    5. Open the ring on the clasp and slide onto the terminator. Close the ring.

    Bookmarks

    Project Instructions
    1 link bead, 1 2" headpin , 1 accent bead(I used a 6mm faceted czech bead), 1 silver plated bookmark, round nose pliers, chain nose pliers

    1. Begin by stringing your headpin with an accent bead.
    2. Make a simple wire loop and hook it onto one of the wire loops of the link bead. Close the loop and trim the excess wire.
    3. Open the jump ring included on your bookmark, string on the remaining loop of the ceramic link bead.
    Pin It button on image hover