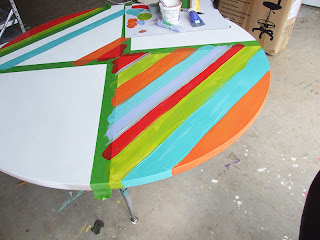
I bought this table a few years ago at the Habitat for Humanity Store here in Athens. I am a sucker for furniture like this. It was an old preschool table with cool turquoise metal legs. It was in my studio for several years. Things have gotten "snug" in the studio so it needed to move. Nik didn't really like the table so I couldn't convince him to move it upstairs....until... I said I would paint it. Then he was interested. It's probably hard to believe he likes color more than me most of the time.
 The top of the table is formica so tat was going to be a challenge to get the paint to stick. I did my research online and then headed to Lowes. Kilz primer was what I was looking for. It turns out they have a spray version.
Here's a picture of the can.
Here's how the table looked before painting. There's lots of furniture out there with this surface. Good to know there's a way to paint it huh?
Here's how I painted the table.
First, I used my electric sander to "rough" up the surface. I really didn't sand a lot, just enough to take the shine away. Be sure to wipe all of the dust off before the next step.
Spray the table with the primer. Since the table was going to be a main coffee table I wanted to make sure the paint was going to stick so I sprayed several coats of paint.
Using my drywall ruler, I found the center of the table and marked an "x" on it.
Next, I marked the lines with painters tape. Notice how I didn't just make an "x" with the tape? This way I could paint two opposite sides at once. Since I would be using a lot of colors I didn't want to keep washing brushes.
Since I like things to look handmade or hand painted I didn't want super straight lines. I put a line of tape down to use it as a guide and painted up close to it but not over it.
I continued painting stripes on these two sides and then removed the tape guides.
Once the paint dried, I could tape the remaining two sides and paint them, just as I did the first two sides.
Lastly, I painted three coats of varnish on the table, let it dried and moved it up stairs.
Enjoy!
Visit my Website, Etsy Shop, Blog, Facebook


Absolutely fabulous!! I want one!!
ReplyDeleteGood to hear from you Lynn! You should make one :)
DeleteSo darn cute! What will you think of next?
ReplyDeleteThanks Holley, I looove painting furniture.
DeleteThat's really handy to know you can paint over that surface. I'm going to start looking around at yard sales. Thanks
ReplyDeleteI was pretty excited that I could paint on that surface as well. Our feet are on the table all of the time and I haven't notice a scratch or wear at all. It seems to be doing it's job.
DeleteHow cool is that!!!
ReplyDeleteHappy to hear you like the table!
DeleteFabulous, Jen! it looks so awesome and unique. What kind of (colored) paint did you use on the top??
ReplyDeleteI LOVE it. Gorgeous and fun just like all your work!
ReplyDeleteOwls are amazing creatures and can be made so cute in fabric and ceramic. My first "owl love" was a bead at ta show.
ReplyDeleteVery nice table. I have a similar old kitchen one I want to paint and have a question. Isn't it sticky after varnishing? What kind of varnish did you use?
ReplyDeleteNow that you've used the table for a good while, how's it holding up to the wear and tear? Thanks!
ReplyDelete