Hey, Hey! I was doing some metal stamping the other day and thought might as well snap some photos and make a tutorial out of it.
It's super easy and fun. Stamping is great for personalizing jewelry for gifts. How about that apple necklace as a teacher gift, what teacher wouldn't love it?
Here's the how-to.
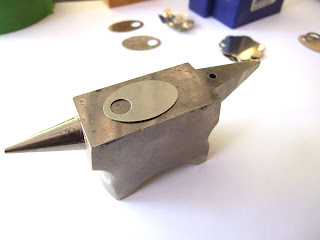
Supplies: Metal stamping blanks, metal letter stamps, an anvil or metal plate( for placing blank on), masking tape, permanent marker, flat surfaced hammer, ball pein hammer (optional)
First, you'll need to place your stamping blank onto your metal anvil or plate.
Place the tape over the top of the blank. This will hold it in place while your stamping. It also makes the stamps stay in one place while hammering.
With your marker, write out what you would like to stamp. This will be a guide for your stamping.
Start by placing the letter standing upright on the blank. With your flat surfaced hammer, hit the top of the stamp 2-3 times without moving the stamp out of place.
Continue across your blank, stamping all of your letters.
When your finished with stamping, remove the tape from your blank.
If you would like your stamp to have more texture, you can use the rounded side of your ball pein hammer to add some. I just randomly bang around on the blank.
To make the letters stand out more on the blank, scribble over them with the permanent marker. Take a cloth and rub the blank. This will push the marker into the crevices.
You're finished with your stamping.
Update: So many have asked for the supplies, here are some Amazon links to get you started stamping. Mini Anvil, ball pein hammer, letter stamps, tape, and stamping blanks.
Enjoy!
Visit my Website, Etsy Shop, Blog, Facebook


I love these!
ReplyDeleteOMG, what a great tutorial! I love the idea of writing the text on the tape before you stamp, thanks for that!!
ReplyDeleteWOW!! Thank you for the tape tip!!! I did not know you could stamp over the tape!!
ReplyDeleteThank you for the tips, Jennifer! These should make things go much smoother ;D
ReplyDeleteThanks for your information. The major tool used in the process of forming a metal is Steel Stamping method. In this method, the metals are formed by giving pressure into the surface of a metal.
ReplyDeleteGreat tutorial! And I love your mini anvil. I seriously need to get one of those for my metal stamping projects.
ReplyDeleteYour idea is adorable and you are talented. Thank you for sharing. I like letter necklace most. I wish I could make one on my own.
ReplyDeleteVery CUTE!
ReplyDeleteThanks for the stamping tip. The tape is a great idea.
ReplyDeleteThank you so much for the great information
ReplyDeleteGreat tutorial- thanks!
ReplyDeleteThis is a great tutorial, with some great tips! Thanks!
ReplyDeleteDiane M.
Brilliant!
ReplyDeleteGREAT tutorial!! Thanks a bunch!!
ReplyDeleteI never thought of stamping over the tape , thanks!
ReplyDeleteThis is one of the best stamping tutorials out there...excellent job!
ReplyDeleteyeah good idea
ReplyDeletegood idea
ReplyDeleteThank you, thank you. This was great and so are you.
ReplyDeleteExcellent photos and clear instructions. The making tape over the blank is the first time I've seen this method. It's great! Thanks for the links also. Cheers!
ReplyDeleteThank you so much for sharing the tip about using the tape....Makes a world of difference !!!! I would have never thought of it myself ! So I really appreciate it.
ReplyDeleteSo, there is no difference between using an anvil or steel plate?
ReplyDelete