Sunday, March 31, 2013

March in Review and Happy Easter


Happy Easter! Hope you're doing well and the bunny brought you lots of chocolate. This year Easter came a little bit earlier but boy our spring did not. I'm pretty sure I can say that on behalf of everyone in this country. What the heck? Here's a little review off the month from the Jennifer Jangles Studio and I am hoping that spring does come in April, it has to right?


 Crochet Project was Finished


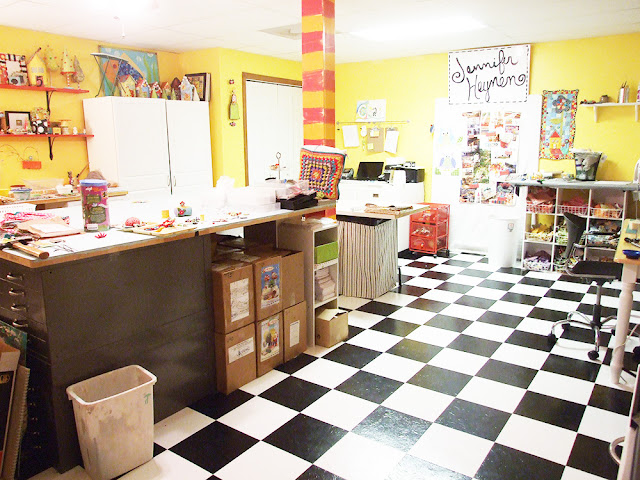
Studio Got (kind of) Organized


New Jewelry and Kits Joined the Etsy Shop


 Jennifer Heynen Beads Showed Up at Michaels Stores

Some Tutorials Also came to the blog....

Flower Mug Rug Tutorial


Some Handy Dandy Visual Guides


Thanks for visiting the blog, I would love to hear how your March was.
Happy Spring!


Visit my Website, Etsy Shop, Blog, Facebook

Saturday, March 30, 2013

Latest Love - Japan


If you read the blog often, you know I find myself immersed in different projects and use the word obsessed a lot. I think obsessed seems a little creepy of a word. I decided just to make my latest obsession, uh, I mean LOVE an regular feature. Here we go post number three of my latest love.....

Japanese crafts They are so dang cute! Have you seen all of the little patchwork and zakka projects. They are all about making every bit of your life happy. See the Tiny Patchworks tagline  "Make My Life Happy Everyday"


Two of my favorite Etsy shops, and where these books came from are Pink Nelie and Collecting Life just in case you want to check them out. I can spend an entire evening shopping easily, just in these stores.

Friday, March 29, 2013

Dolls Apron Tutorial


 I made up this little apron for Rhubarb. Because it ties in the back it will fit just about any doll or stuffy that is around 16-18 inches tall. It's an easy pattern to adjust the size if you need to alter it. Here's the how-to.


 Supplies:

1/4 yard cotton quilting fabric
2 3/4" buttons
coordinating thread

Cutting Instructions:
Cut 1 strip of fabric measuring 3" x 44"
The remaining piece should be 6" x 44" if you're using a quarter yard piece of fabric.


 1. Fold the largest piece of fabric in half and press. On the longest side with the raw edges, sew a gathering stitch. Pull the threads to gather the apron piece so that the gathered side measures  9 inches. Set aside.


2. Take the remaining piece of fabric and fold it in half so the right sides are facing outward. Press this seam.


3. Open this piece up and press each raw edge inward approximately 1/4 of an inch.


4. It should now look like the above image. Next, cut a 12 inch piece off of the folded fabric.


5. Sew down the edge of the 12 inch piece. Cut this piece of fabric in half so that each one measures  6 inches. These are the two straps of the apron.


6. With the remaining strip of folded fabric, tuck in the raw edges at the ends. Pin in place.


 7. Find the center of the apron piece by folding it in half and marking it with a pin. Next, find the center of the long tie by folding it in half and marking it with a pin. Line those pins up and insert the raw gathered edge into the center of the tie. Pin in place.


8. Go back and tuck each strap into the folded fabric and pin into place as well. Notice when pinning, that one side of the strap is lined up with the edge of the apron.


9. Starting at one end of the tie, sew all of the pinned edges.


10. Fold the apron straps upward and tack into place with a needle and thread. Sew on two buttons and you are finished.

Have fun!


P.S. You can see my Otis and Rhubarb sewing pattern here. The fabric used in this pattern is from my Extraordinary World fabric collection from In The Beginning Fabrics.

Let's Connect and don't forget about my free Whimsical Flower Pins Pattern.


Visit my Website, Etsy Shop, Blog, Facebook

Thursday, March 28, 2013

New Quilt Pattern Sneak Peek


There's a new sewing pattern heading to the printer this week. Here's a little sneak peek. You'll get to hear first when it arrives...promise.

Visit my Website, Etsy Shop, Blog, Facebook

Tuesday, March 26, 2013

Please Meet My Art Licensing Agent


In January I signed with a licensing agent. A what? Well you know how I license my designs to In The Beginning Fabrics and they put them on quilting fabric? Well, I would like to do more licensing, but as usual, there are not enough hours in the day to get everything done that I would like to do. Kimberly of Montage Licensing is going to be helping me with my plans.

At the top is a sell sheet, (just learned about those), I've been spending the last few weeks going through all of my designs and creating these. It's fun to revisit some of these designs. Plus, I've been painting more. Here's an Fall Owl Painting I recently did.


Montage Licensing also has a Facebook page where Kimberly updates it with all the new work she receives from her group of artists.

Have a great day,


Visit my Website, Etsy Shop, Blog, Facebook

Sunday, March 24, 2013

New Jewelry and Kits


Hey, Hey, Happy Spring! New jewelry and kits are arriving in the Etsy shop. They were in the newsletter last week, so if you're a subscriber you might have seen them there. I've been making lots of spring colored jewelry and beads. I am lovin gold these days with these lighter colors.
Did you see the handy dandy visual guides for jewelry making? You can Pin them or print them here.


Next on my list is a bracelet made with these flowers...


Happy Spring!


Visit my Website, Etsy Shop, Blog, Facebook

Friday, March 22, 2013

Studio Clean Up and Organization


I can't believe I am showing you this picture...It's kind of ridiculous, this place is torn up. It's been quite a mess lately, actually every since I moved back from the gallery. It's bee quite a challenge to organize it and make it all fit into one space.

Nik hung some shelves for me, not that I couldn't do it, but in actuality, he's much better at hanging them straight. It woudn't bother me if they were a little bit crooked and it would be a problem once I started adding things to them. 


It's a tad sad though, because these metal shelves have been with me since 1996, when I started my business. Kind of crazy, they have been well used and they are starting to bend they have been so well used. They are in my garage now waiting for me to take them away. But for now I am too attached to take them. It's funny, because I'm not usually attached to things.


The truth behind the motivation for this whole studio organization was that a magazine editor and her crew were coming to my house to photograph and interview me for a magazine. Unfortunately, I got a call last week saying the magazine was going away. What? All this work and no pictures? I guess in the end it had this place needed to be cleaned up anyway.

So here is what I have done so far....


My beading area


Folded and rolled my fabric


Organized my scraps by color in baskets


Spiffed up my shipping supply closet


Made this counter my bead glazing area (still needs some work)


(Glamour shot of my yarn basket for fun)


One shelf is my Etsy Store and one shelf is my Jangles Store


It's starting to look a lot better. Of course now that the photographers aren't coming on Friday, how will I ever find the motivation to finish it?

Have a great day!


Visit my Website, Etsy Shop, Blog, Facebook

Wednesday, March 20, 2013

Jennifer Heynen Beads in Michael's Stores


They are here! I can finally spill the beans. This has been a top secret project for so long, that my family and close friends didn't believe it was going to happen. Four year ago, Michael's and I started talking about a potential line of ceramic beads. There have been a few delays and lots of back and forth approvals to bring these beads to each and every Michael's store.

Here's a cheesy picture of me, trying to photograph myself in front of the beads.


Here's a picture of one of the glaze testing boards. This is one of many samples that went back and forth. I'm kind of picky about my colors and Michael's nailed them. I don't know f I should be showing these behind the scenes things online so don't tell anyone you saw these.


And finally, here are a few of my favorite beads...


Oh, and one more picture..these chains with teeny ceramic beads...


If you want to see the free projects I designed to go with the beads, you can click on the Michael's box on the side of my blog. Or you can click on the box below.


Now the bummer part :(

These will only be in stores for a few months...

Thanks for stopping be the blog,


Visit my Website, Etsy Shop, Blog, Facebook
Pin It button on image hover